
Showing posts with label Android. Show all posts
Showing posts with label Android. Show all posts
Thursday, November 6, 2014
Friday, April 11, 2014
Animated GIF ImageView Library for Android
Okay Good People!!!
Announcing today a brand new library which is intended to help you out with displaying Animated GIF's within your applications.
WHY A NEW LIBRARY?
As an Android developer you would have noticed that Android has not provided support for Animated GIF's as a component.
Therefore in order to show an Animated GIF's we usually end up using WebView in application which has its own disadvantages (Memorish Isuuess!!!).
THAY THE LIBRARY!
https://github.com/abhinavasr/giflib
Screenshot of Sample Application


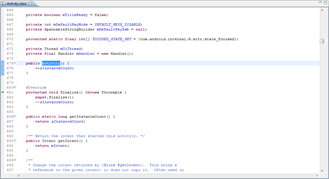
The Sample application demonstrate that the Library Can handle both regular Image (PNG/JPG) and Animated GIF on same View. Therefore giving developer the flexibility to use Image/GIF without making any changes to his/her code base.
Sample Implementation:
layout.xml
android:id="@+id/animatedGifImageView"
android:layout_width="match_parent"
android:layout_height="wrap_content"
android:layout_alignParentLeft="true"
android:layout_alignParentRight="true"
android:layout_above="@+id/button1"
android:layout_below="@+id/textView1" />
Activity.java
animatedGifImageView = ((AnimatedGifImageView)findViewById(R.id.animatedGifImageView));
animatedGifImageView.setAnimatedGif(R.raw.animated_gif,
TYPE.FIT_CENTER);
That's It!
AnimagedGifImageView supports some basic parameters to give you better control of image resizing (If required) There fore you can pass :
FIT_CENTER: Stretch and fit image while maintaining aspect ratio
STREACH_TO_FIT: Stretch Image irrespective of aspect ratio
AS_IS: Place the image without any manipulations.
Hope you will use the library and make your life easier :)
Friday, November 22, 2013
Barcode Scanner and Generator (Version 2)

On November 4th, 2012 we launched QR Code Scanner and Generator V1
(http://abhinavasblog.blogspot.sg/2012/11/creating-your-qr-code-scanner-and.html)
THANK YOU FOR YOUR SUPPORT TILL DATE
Since then we made numerous progres on the library and updated it time and again.
Time has now come to welcome better smarter version of BarCode fragment library.
Please welcome Barcode Fragment Lib V2
The library is located at https://code.google.com/p/barcodefraglibv2/ .The library has better features and more detailed samples.
Unlike previous versions you can now simply add a jar in your app and start using the complete scanner functionality.
You can download the jar's from here: BarcodeLibraryFragment and Barcode Core (Please note both jars are mandatory)
Library now also support some added barcode types (e.g Aztec, Datamatrix).
Please read the wiki located at https://code.google.com/p/barcodefraglibv2/wiki/HowTo to start using the library.
There is a sample implementation for easier understanding of usage at : : https://code.google.com/p/barcodefraglibv2/wiki/SampleImplementation
I am also looking for the contributors for maintaining the library. Please let me know if you are interested to enhance this library.
Wednesday, June 26, 2013
Browsing through Android Source Code
Many time we want to understand how are Android API's implemented,

For example when you are using a API and want to understand the implementation of that api, you certainly don't want to browse through entire Android source to check what the implementation, it just kills the fun.

From

To

Here are the simple steps to understand how to do this!
WHAT ALL IS REQUIRED?
To accomplish this you need 2 things
- Eclipse
- Internet connection
Install this plugin in your eclipse http://adt-addons.googlecode.com/svn/trunk/source/com.android.ide.eclipse.source.update/

Once completed accept changes and restart your eclipse.
Now next time you wanna checkout the source just check for definition of class/function. :)
Monday, March 4, 2013
Expense Tracker
Hey All,
It has been quite sometime we did any fun stuff.
Well have been busy with lots of things.. practically SUPER LOTS ...
Anyways, will tell you about those some other time.
Today announcing a new app in market named as Expense Tracker.
Well, its not exactly a new concept and its not like i haven't rolled something similar before. If any of you remember i did roll out an application for devices up to 2.3 a similar application named as Easy Pocket Lite.
The new application is based on rich android UI deisgn following HOLO theme application helps you manage your expenses in a really easy and quick way. It has almost zero setup time.
All you need to do is to go to settings -> Enter your monthly amount (Something like your salary) -> Enter your currency. AND YOU ARE DONE :
Every time you want to add a transaction simply click on + and follow a very minimal steps to add in the transactions.
You can also view your transactions in multiple ways.
Sunday, November 4, 2012
Creating Your QR Code Scanner and Generator
THIS LIBRARY HAS BEEN DEPRICATED, PLEASE USE BARCODE FRAGMENT LIBRARY V2
Hey Everyone...Has been long since i posted any of the open source codes which could help you develop some awesome apps.
Well was working on couple of things.. :D
Anyways recently have been working with QR Code scanning and other stuffs...

WHAT IS QR-CODE?
As per wikipedia
QR Code (abbreviated from Quick Response Code) is the trademark for a type of matrix barcode (or two-dimensional code) first designed for the automotive industry. More recently, the system has become popular outside the industry due to its fast readability and large storage capacity compared to standard UPC barcodes. The code consists of black modules (square dots) arranged in a square pattern on a white background. The information encoded can be made up of four standardized kinds ("modes") of data (numeric, alphanumeric, byte/binary,Kanji), or through supported extensions, virtually any kind of data.
We do have several libraries available.. (Many are paid and asks for upto $50k/1000 users and some free (zxing).
Now the obvious question is: WHY ANOTHER LIBRARY?

1. The library is based on Zxing
2. It is based on Fragments which means that you can simply add the scanner functionality in any of your existing application without changing even a single line of code.
3. You can invoke the scanner within a part of screen just like a small view, unlike the existing where you need to launch a new activity all together just to make a scan.
WHERE IS THE LIBRARY?
Here is the link : http://code.google.com/p/barcodefragmentlib/ (depricated)
Please use: https://code.google.com/p/barcodefraglibv2/
HOW TO TEST FUNCTIONALITY?
You can download the apk which has been generated from the provided source.
LICENSE?
As always its under Apache License. So feel free to use.
Lemme know if it helped.
Tuesday, September 18, 2012
Customizing Android Phones
Easy steps for phone customization
Phones, as i believe, is something very very personal. Then why my phone should be exactly like anyone else's phone around? Why should it even look or behave like someone else's?
OpenSource was crafted with this intention, they gave all possible opportunity to people to create their own environment. A place where they can have everything just the way they want.
When i talk about OpenSource in Phone environment i guess we all know what we are talking about here... Yepp Android Operating system.
Well here are some easy ways by which you can customize your phone and make it behave exactly the way you want.
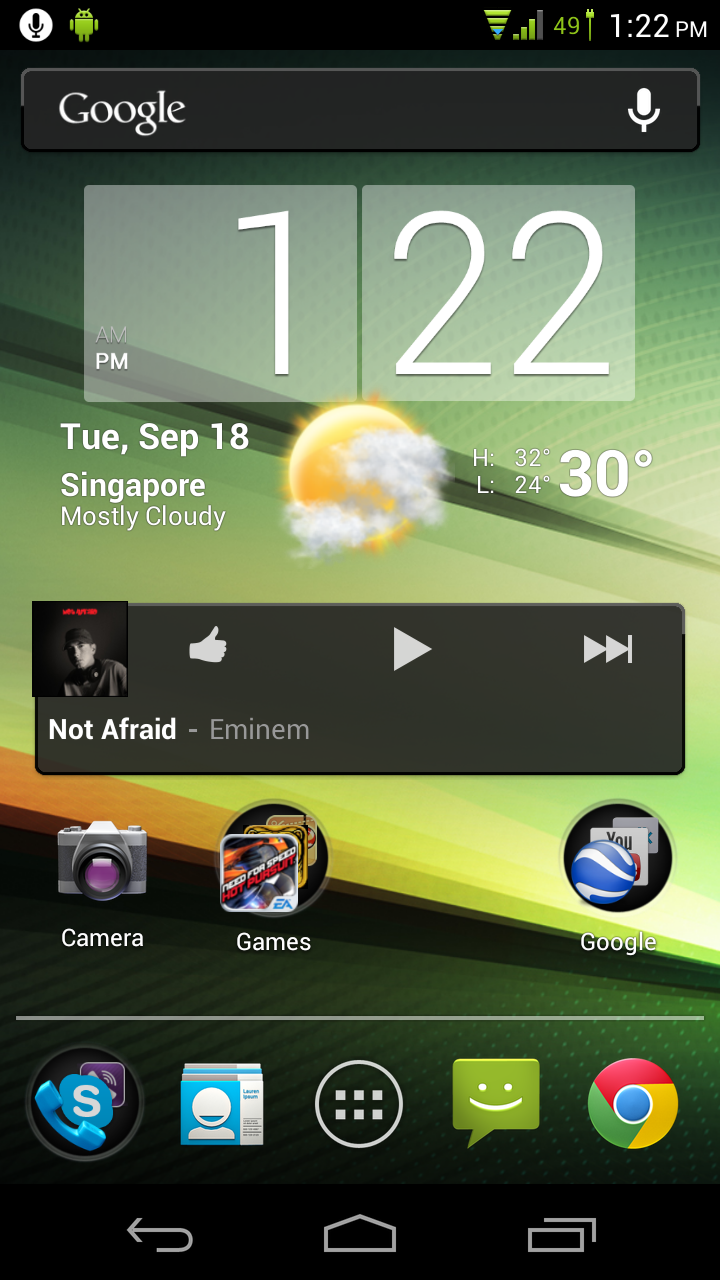
STEP 1 (Non rooted / rooted phones ):
Widgets : This has been on Android since the beginning of time :) Many of you must have been using it already on your phones and many haven't.
Widgets are by definition small portion of application which can work on your home screen and provide you a quck and easy way to access your application contents without even opening the application. For example the above screenshot contains three widgets
1. Google search widget
2. Clock
3. Music Player
Put them together and your screen becomes gorgeous :)
STEP 2 (Non rooted / rooted phones ) :
Wallpapers : Again you have couple of choices. You can use a static image as a wallpaper or can go for live wallpaper. WHATS LIVE WALL PAPER ? Its a wallpaper which can perform actions. For example it can show you a ocean view and you will see the waves around. there are hundereds of free live wallpapers available on android market, just check em out :)
STEP 3 ( Rooted / Custom roms) :
Ok.. so you stayed long enough to reach this section... this is for pro users who love to play in deep :)
There are plenty of options for you, namely Cyanogen, AOKP, MIUI and many others out there... all of them have some pros and cons. Cyanogen undoubtedly has the biggest community support followed by AOKP and MIUI. I personally use Cyanogen on my Galaxy Nexus device.
These roms give you plenty of options to modify the system not only on appearance but also you can overclock your processor and get an awesome experience which you could have never got from your phone.
Here are some of the things that you can do!


So you can see the customization at notification area and the Lock screen.
There are millions of other coool stuffs that you can start doing.. ( One of my Fav.. Run Ubuntu on your Android )
STEP 4 (Rooted / Custom Rom) :
THEMES : YOu can install themes on your device... and trust me it ant gonna slow your system down.. :)
Here are some changes which happened on settings and other places due to themes:


Change your phone every day with themes...
Hope you enjoyed and will try to make your phone a little more personal :)
Saturday, July 28, 2012
Nexus All models Factory images released..

So now, you can get your phones updated to Jelly Beans (If you haven't got yourself updated yet) with official images.
Official Images also comes handy if you have screwed up your phone by putting in some nasty custom roms.
To Install the factory images there are some small BABY STEPS that you need to take.
I have already posted the method to install the factory image for 4.0 in my previous post which is here : http://abhinavasblog.blogspot.sg/2012/06/installing-custom-rom-on-galaxy-nexus.html
All you need to do is instead of downloading 4.0 OS build you need to download it for 4.1
The entire list of changes in Jelly Beans from ICS is provided here : http://www.android.com/about/jelly-bean/
Happy Jelly Beans... :)
Monday, July 16, 2012
Rooting Android 4.1.1 Galaxy Nexus

So.. many of you must be happy with your new awesome Jelly Beans... :) (Ofcrs people who got it)
and many of you will be sad hat you now lost all your rooted power...
Yes you loose root and your custom recoveries as soon as you put official Jelly Beans on your Galaxy devices.
We we have a solution now.. :)
It involves a small trick...
From my previous posts you already know how to root your devices till 4.0 (ICS)
Since we will be doing lot similar stuff here... so lets refresh your memory
- adb reboot bootloader
- adb devices
- If cannot find your device
- Add Device
- Device Manager
- Right Click on Android 1.0
- Manually update driver
- Choose Driver from List
- Android Usb Devices
- Samsung USB Composite
- Fastboot oem unlock
Now this part is all new for Jelly Beans so read carefully and dont miss anything:
- Start your phone...
- Copy CWM SuperSU in sd sdcard
- Shutdown your phone and restart the phone by holding down to Volume Up+ Volume Down + power
- Type in fastboot flash recovery <recovery-file.img>
- By using Volume key navigate to Recovery Mode
- You will reach to custom recovery
- Select Install zip from sdcard
- Select SuperUser zip from sdcard by pressing Power Button.
- Once installed type following command
- adb shell
- cd system
- mv /system/reboot-from-recovery.p /system/reboot-from-recovery.bak
- fastboot oem lock
That's it... You have your latest rooted Jelly Beans... :)
Sunday, December 25, 2011
Transliteration Keyboard
Many of us who have capability to read and write out native language on our Android devices are unable to do so just because we are not comfortable with variety of keyboard layout for our languages.

Well it has been a problem for me... I had been wondering that if there was a way by which i could write Hindi on my android device.
So, i made it... :)
Use the above URL to download an application named UKeyboard.
How it works?
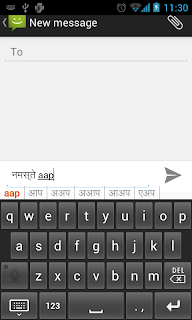
UKeyboard is a unique application which gives its user liberty to type on English keyboard and find suggestion in his / her native language.
Application support majority of languages including Russian and Chinese.
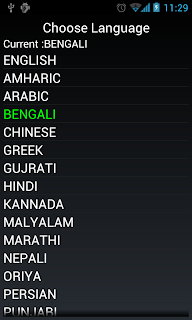
How to set it up?
1. Select your language.
Open the UKeyboard app and select the language you want to use your keyboard for.
2. Just like any keyboard. you need to allow it from your settings.
Settings -> Language & Input -> Check UKeyboard
you are half way done...
Go to any text input field. -> press long click -> choose UKeyboard
That't it.
No type and enjoy.
Do remember, UKeyboard uses internet to fetch the correct relevant sugestions, hence
1. It may be a little laggy
2. Do not use this when you need to type password / Credit card / Debit card info.


Friday, November 25, 2011
Treat for Tester friends :)
Testing is one of the most critical aspect of any application development.
So, Here is something for all my tester friends who are in high need of some image capture too for android.
I have attached two files Abhi.py and Abhi.bat,
All you have to do is to add these files in your exsisting tools folder of Android-sdk
and run abhi.bat
WHAT WILL IT DO?
well ..good question :)
It ask you some basic params like (How many snapshots you want to take and where you want to save)
Remeber 1 snapshot = 1sec so if you want to record your application on device you can simply start the abhi.bat with 500 value and it will keep on taking the snaps.
By default it will create capture folder in your D drive and if this folder already exsists it will override that folder (so do remember to take backups )
You can terminate the application t any point of time my simply closing thw window opened by this bat. :)
Abhi.py
Abhi.bat
Hope it comes use full :)
Monday, September 5, 2011
Android Infinite Looping Gallery
Hey there,
For a very long time i had been watching people struggling for developing a Infinite Looping Gallery in Android.
Saw very different solutions... some seriously complicated and some ... Not even close to solutions. So, drafted a small snippet which details about how you can create your (Virtually) Infinite Gallery.
Virtually -> No we are not going to use any thing like Integer.MAX_VALUE for number of elements in the list. No crazy circular linked list or anything of that sort and yes no copy pasting from Android Source.
Enough talk, lets code :D
All you need is a Gallery from android and some small peice of code.
Associate this listener to your Gallery
/**
* Copyright [2011] [Abhinava Srivastava]
*
* Licensed under the Apache License, Version 2.0 (the "License"); you may
* not use this file except in compliance with the License. You may obtain a
* copy of the License at
*
* http://www.apache.org/licenses/LICENSE-2.0
*
* Unless required by applicable law or agreed to in writing, software
* distributed under the License is distributed on an "AS IS" BASIS, WITHOUT
* WARRANTIES OR CONDITIONS OF ANY KIND, either express or implied. See the
* License for the specific language governing permissions and limitations
* under the License.
*/
// Constants
public final static int ADDED_EXTRA = 6;
public final static int[] mImageIds = {R.drawable.a,R.drawable.b,R.drawable.c,
R.drawable.d,R.drawable.e,R.drawable.f,
R.drawable.g,R.drawable.h,R.drawable.i,
R.drawable.j,R.drawable.k,R.drawable.l,
R.drawable.m,R.drawable.n};
// Associate it to your gallery.
private OnItemSelectedListener listner = new OnItemSelectedListener() {
public void onItemSelected(AdapterView<?> arg0, View arg1, int arg2,
long arg3) {
if (arg2 < ImageAdapter.ADDED_EXTRA / 2)
((Gallery) findViewById(R.id.gallery1)).setSelection(
mImageIds.length + 2, false);
if (arg2 > mImageIds.length + ImageAdapter.ADDED_EXTRA / 2) {
((Gallery) findViewById(R.id.gallery1)).setSelection(4, false);
}
}
public void onNothingSelected(AdapterView<?> arg0) {
((Gallery) findViewById(R.id.gallery1)).setSelection(3, false);
}
};
In your Adapter just need to modify 2 places.
/**
* Copyright [2011] [Abhinava Srivastava]
*
* Licensed under the Apache License, Version 2.0 (the "License"); you may
* not use this file except in compliance with the License. You may obtain a
* copy of the License at
*
* http://www.apache.org/licenses/LICENSE-2.0
*
* Unless required by applicable law or agreed to in writing, software
* distributed under the License is distributed on an "AS IS" BASIS, WITHOUT
* WARRANTIES OR CONDITIONS OF ANY KIND, either express or implied. See the
* License for the specific language governing permissions and limitations
* under the License.
*/
public int getCount() {
return mImageIds.length + ADDED_EXTRA;
}
public View getView(int position, View convertView, ViewGroup parent) {
if (position < ADDED_EXTRA / 2) {
position = GalleryTestActivity.mImageIds.length
- (ADDED_EXTRA / 2 - position);
} else if (position >= (GalleryTestActivity.mImageIds.length + (ADDED_EXTRA / 2))) {
position = position
- (GalleryTestActivity.mImageIds.length + (ADDED_EXTRA / 2));
} else {
position -= (ADDED_EXTRA / 2);
}
View view = convertView;
if (view == null) {
view = inflater.inflate(R.layout.items, parent, false);
}
try {
((ImageView) view)
.setImageResource(GalleryTestActivity.mImageIds[position]);
} catch (Exception e) {
Log.i("ARRAY INDEX", "Position" + position, e);
}
return view;
}
yeah that's it.. nothing more... you are ready with you infinite looping circular gallery.
Friday, September 2, 2011
Sharing your PC Internet to Android Device (Wifi)
I had been stuck in situations when i was not able to use any 3G or Wifi (Hotspot) internet (Mostly happens in companies).
So in case you want to share your internet connection to your Android devices. There is a very simple yet powerful tool known as Connectify.
YOU CAN ONLY DO THIS ON WINDOWS 7 AND ABOVE ONLY + YOUR PC SHOULD BE WiFi ENABLED.
Very handy and easy to use tool. Best part you can use it free.
Just visit the site: www.connectify.me and download the application.
1. Install
2. Wifi is ready to be shared :D
3. Find your wifi network you just created on your mobile
4. Start browsing :)
Hope this info will be useful.
Disclaimer: Connectify is a third party tool which i recently came across, and worked very well for me. In case it is not working for you... Sorry cannot help...
Tuesday, August 23, 2011
Let the Patents War Begin... (If they really want to)
Till now it seemed that Android was in a dangerous enviroment which has lots of threats from its eco-system.
Well the acquasition of Motorola Mobility is proovinig to be a Gold mine for google in porder to resist the attacks from apple and Microsoft.
THE MOST TALKED ABOUT 18 PATENTS
With the bunch of 17k patents + 7.5K pending patents there come "18" key patents which can be enough for Google to make Apple call its hounds back.
- US patent #5,311,516 – Paging systems using message fragmentation to redistribute traffic
- US patent #5,319,712 – Method and apparatus for providing cryptographic protection of a data stream
- US patent #5,490,230 – Digital speech coder having optimized signal energy parameters
- US patent #5,572,193 –Method for authentication and protection of subscribers in telecommunications systems”
- US patent #6,175,559 – Method for generating preamble sequences in a code division multiple access systems
- US patent #6,359,898 – Method for performing a countdown function during a mobile-originated transfer for a packet radio system
- US patent #5,359,317 – Method and apparatus for selectively storing a portion of a received message in a selective call receiver
- US patent #5,636,223 – Methods of adaptive channel access attempts
- US patent #6,246,697 – Method and system for generating a complex pseudonoise sequence for processing a code division multiple access signal
- US patent #6,246,862 – Sensor controlled user interface for portable communication device
- US patent #6,272,333 – Method and apparatus in a wireless communication system for controlling a delivery of data
- US patent #7,751,826 – System and method for E911 location privacy protection
- US patent #5,710,987 – Receiver having concealed external antenna
- US patent #5,754,119 – Multiple pager status synchronization system and method
- US patent #5,958,006 – Method and apparatus for communicating summarized data
- US patent #6,008,737 – Apparatus for controlling utilization of software added to a portable communication device
- US patent #6,101,531 – System for communicating user-selected criteria filter prepared at wireless client to communication server for filtering data transferred from host to said wireless client
- US patent #6,377,161 – Method and apparatus in a wireless messaging system for facilitating an exchange of address information
For the starters...
One patent from 2001 disables a "touch sensitive" sensor when a smartphone is near a user’s head to prevent inadvertent hang-ups or dialing. Another from 1994 aims to increase data storage, while a third enables users to control when a global positioning system sends their location data over a network.
Well it all looks quite beautiful again for Android...
Friday, August 12, 2011
Windows Lovers.. Something good for you... :)

It is rumored that the Mango update to WP7 will be be released on September 1, this release date should put it in direct competition with product launches from both Apple and Google.
With all of the iPhone rumors swarming around lately there hasn’t been much Windows Phone 7 news to talk about. Well that changed today, with reports that the Mango update to WP7 will come out on September 1. Just a couple of weeks ago we heard from Microsoft that the OS was ready for phones, and it was only a matter of time before we would see it in the wild.
There is still no word on yet if new hardware will be coming out on September 1 along with the updated software. When WP7 was first launched it was launched on several phones and carriers all at once, but we don’t know if that will happen this year. The current generation of WP7 devices will start getting over the air updates on September 1, but everything else is still up in the air.
The Mango update to WP7 is supposed to address most of the main areas of concern with the current product, and add some features on top of those improvements. For a more in-depth overview of what to expect from Mango check out the post on its features.
We just talked about Google bumping up the Ice Cream Sandwich launch to October to compete with Apple’s still unannounced iPhone; Now with Microsoft launching Mango around the same time it will create a perfect storm of cell phone choices. The key features of both iOS 5 and Mango have already been highlighted so the only real wild card operating system wise will be Ice Cream Sandwich. On the hardware side of things it is pretty much anyone’s guess to how most of the new phones will look or function. No matter what happens we’re looking forward to this fall, and are starting to save up money now.
Friday, July 29, 2011
Google Maps Update to Version 5.8

Google has introduced better integration across Maps, Latitude and Places on Android devices with version 5.8.
Google has released version 5.8 of Google Maps for Android based mobile devices. The update adds a number of new features, including making it easier for users to upload photos from their phones and tag establishments.
The changes are actually less focused on the map functionality and more on the application’s integration with Google Places and Latitude. For all the recent discussion of Google’s entrance into the social networking space (again) with Plus and its upcoming battles with Facebook and Twitter, it’s worth noting that these changes take more direct aim at services such as foursquare and Yelp (and Facebook check-ins).
 Perhaps the most important change, in that sense, is being able to upload photos for a Place directly from your phone. Very rarely do restaurant goers take the time to upload their photos from a dining experience when they get home. Now they can build far richer content into Places with a few clicks on their phone. These photos can be viewed or removed using your Picasa account.
Also, Places now allows “descriptive terms” from your phone, certainly capturing more real-time reactions of an establishment’s qualities. These terms (“Great meatball sub”, “Rowdy bar”, etc.) then bubble to the top of the profile for each place upon search. Behind the scenes, these descriptive terms certainly aid establishments in choosing appropriate search terms to bid on.
Another useful feature is being able to add a new establishment “on the go” in Latitude. If you enjoy letting your friends know your location and where you’re hanging out, there is nothing more frustrating than searching for the establishment to no avail. The “Add place” functionality takes care of that issue. This feature has not (yet) been integrated to have the newly created establishment show up on Places or Google Maps. This is likely to prevent people from creating fake or unauthorized accounts where they could then trash a place they don’t like.
Subscribe to:
Posts (Atom)